Step-by-step Core Data Migration
This post is now out-of-date, please instead see: "Progressive Core Data Migration".
People really care about their possessions. Nowhere do you see this more than on public transport. It's not unusual to see bags occupying seats while people stand. As a Brit, we have developed a powerful non-verbal based form of communication to indicate that you want someone to move their bag - maybe a slight shuffle, eye contact with other standing commuters and tutting. Even with these clear signs some people have the audacity to ignore them and force you into the doing the unthinkable - speaking to a stranger on public transport.
"Excuse me, could you please move your bag so that I can sit down"
Surprisingly often, you are met with disdain as the other person consigns their bag to the indignity of the floor. As you settle into your seat and (pretend to) read, you begin thinking how oddly connected we are to our possessions rather than the needs other humans.
But it turns out that it's not just physical items that we really care about, we also feel the same way about our data. Especially if the data has been earned somehow - think about the sense of betrayal you feel when a game crashes and takes your just unlocked thingamabob with it.
In our iOS apps we often store these thingamabobs in Core Data. The structure of which is defined by a model/schema - a set of entities with attributes and relationships. A common situation in development is that over time our model changes. In order to allow these changes to happen we need to migrate our user's data from the old structure to the new structure. In this post, we are going to build a simple system to handle Core Data migrations.

If you want to follow along at home you can download the example project we will be working through from my GitHub repo. We are going to work through 4 different Models changes and see how our migration approach can handle each unique change.
Green field projects 🌿
On a green field project we don't have to care about migrating because we don't have anything to migrate. So lets see our first Core Data stack:
class CoreDataManager {

    lazy var persistentContainer: NSPersistentContainer! = {
        let persistentContainer = NSPersistentContainer(name: "CoreDataMigration_Example")

        return persistentContainer
    }()

    lazy var backgroundContext: NSManagedObjectContext = {
        let context = self.persistentContainer.newBackgroundContext()
        context.mergePolicy = NSMergeByPropertyObjectTrumpMergePolicy

        return context
    }()

    lazy var mainContext: NSManagedObjectContext = {
        let context = self.persistentContainer.viewContext
        context.automaticallyMergesChangesFromParent = true

        return context
    }()

    // MARK: - Singleton

    static let shared = CoreDataManager()

    // MARK: - SetUp

    func setup(completion: @escaping () -> Void) {
        loadPersistentStore {
            completion()
        }
    }

    // MARK: - Loading

    private func loadPersistentStore(completion: @escaping () -> Void) {
        self.persistentContainer.loadPersistentStores { description, error in
            guard error == nil else {
                fatalError("was unable to load store \(error!)")
            }

            completion()
        }
    }
}
CoreDataManager is a singleton who's responsibility is to setup the Core Data stack and provide access to various different contexts. If you have ever seen a Core Data stack setup before, you will instantly notice how little code the above manager contains. Over the years Core Data has evolved and become more developer friendly. Above, we are taking advantage of a relatively new piece of the Core Data family - NSPersistentContainer which was introduced in iOS 10. The NSPersistentContainer simplifies the creation of the managed object model, persistent store coordinator and the managed object contexts:
lazy var persistentContainer: NSPersistentContainer! = {
    let persistentContainer = NSPersistentContainer(name: "CoreDataMigration_Example")

    return persistentContainer
}()
Our example project is called
CoreDataMigration-Example- see Apple's documentation on why the-has become a_
As we will see later we can still get access to our NSManagedModel, NSPersistentStoreCoordinator and NSManagedObjectContext instances via this container but we no longer have to copy and paste in their set-up code.
With loading a persistent store(s) being is an asynchronous operation, our setup needs to also be asynchronous:
func setup(completion: @escaping () -> Void) {
    loadPersistentStore {
        completion()
    }
}

// MARK: - Loading

private func loadPersistentStore(completion: @escaping () -> Void) {
    persistentContainer.loadPersistentStores { description, error in
        guard error == nil else {
            fatalError("was unable to load store \(error!)")
        }

        completion()
    }
}
As Core Data is so central to what we do in our apps, if we are unable to load the store the above method throws a fatal exception - this will allow us to fail fast during development.
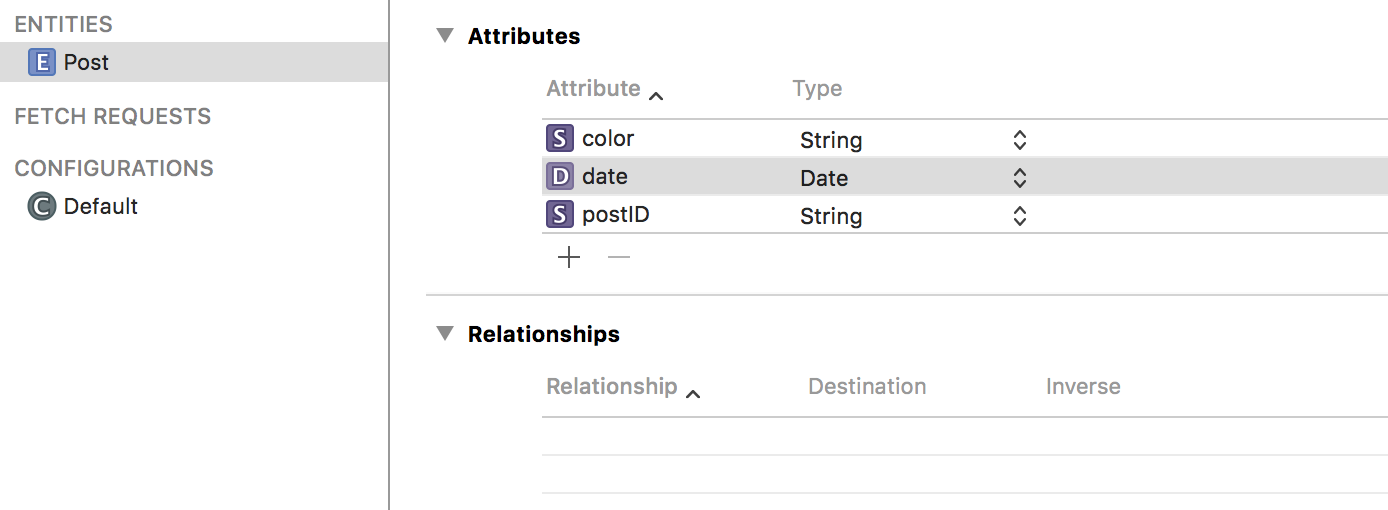
Our model consists of a single Entity Post that consists of 3 properties:
postIDcolordate
From v1 to v2
So we release the app (with the version1 of the model) and our users ❤️ it.
Of course - you did a great job!
Due to this success we hire a new developer. In their first week they mistake the information stored in the color property on Post to be a representation of a color as an RGB string (when in fact it is represented as a hex string) which leads to the app crashing 😞. To avoid this issue happening when we hire more developers we decide to rename that property to hexColor. Now this is a change to the model which means a new model version which will result in a migration.
Before we delve straight into the migration itself, let's look more in depth at the migration process works.
The Migration Process
Core Data supports evolving the model over time. It does this by allowing us to create new versions of the model so that we end up with something like:
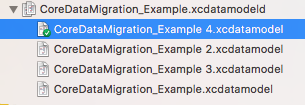
(The green tick indicating which version is currently being developed against.)
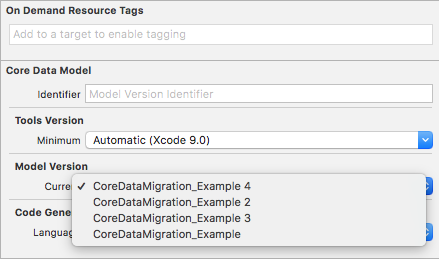
To change the current version you would switch the Model Version value shown below:
With this ability to evolve the model over time, we also need to handle migrating the user's data from one model version to another another. This is handled by creating a mapping model between those two versions. By default in iOS the migration process is completed in 1 step from source to destination models so if we support 4 versions, mapping models would exist for 1 to 4, 2 to 4 and 3 to 4. While this approach is the most efficient (in terms of processing and migration time), it is also the most developer and tester heavy. With each new destination model we need to redo all the paths between those models. So if we introduce version 5 we now need to be handle 1 to 5, 2 to 5, 3 to 5 and 4 to 5 - as you can see there no reuse from the previous migration paths. For each new version you must add n-1 new mappings. This can lead to a lot of work (and potential for 🐞s) for each new version of the model we introduce or convince us to drop support for migrating from certain versions and so result in corrupted data for any users on those dropped versions 😞.
Instead of following the default migration process, we will look at a system that performs migration over multiple steps i.e 1 to 2, 2 to 3, 3 to 5 and 4 to 5 - this means that for each new version of the model we need only add 1 additional step.
But before we get into get into the technical details of our migration implementation, lets look at our migration options.
The first question to ask yourself before engaging in the migration process is:
"Do I need to bother with migration?"
Seriously, just because you use Core Data in your project does not mean that you need to care about migrating the data stored there. If you only use Core Data as a local cache and always override it with the content you get from an API response, you probably don't need to go through the effort of migrating from one version to another. Just delete the local .sqlite files and recreate your Core Data stack, populating that new model with calls to the API. If that applies to you, you can stop reading now if you want or continue on with a certain smugness knowing that the difficulties being described below do not relate to you 😜.
Now in iOS you have 2 migration options:
Lightweight
Lightweight migration is where Core Data is able to infer how to migrate from source model to the destination model.
Standard
Standard migration is where Core Data isn't able to infer how to migrate and we have to detail the path by providing a custom mapping model *.xcmappingmodel and/or NSEntityMigrationPolicy subclasses.
It's important to note that both Lightweight and Standard migration techniques will produce a mapping model, it's just that in Standard the mapping model is explicitly created and lives in the project as a *.xcmappingmodel file.
Both Lightweight and Standard migration techniques can be achieved automatically or manually. By default with NSPersistentContainer Core Data will attempt to perform Standard and then fall back to Lightweight if it can't find the needed mapping model. For the rest of this post will be focused on handling all migrations manually - this allows us to specify the step-by-step approach mentioned above (automatic migrations try to migrate in 1 step). To disable automatic migrations we need to set the shouldInferMappingModelAutomatically on the NSPersistentStoreDescription to false - we will see this happening later.
From v1 to v2 cont.
So back to the task at hand. As we seen above we need to introduce a new version of the Core Data model.
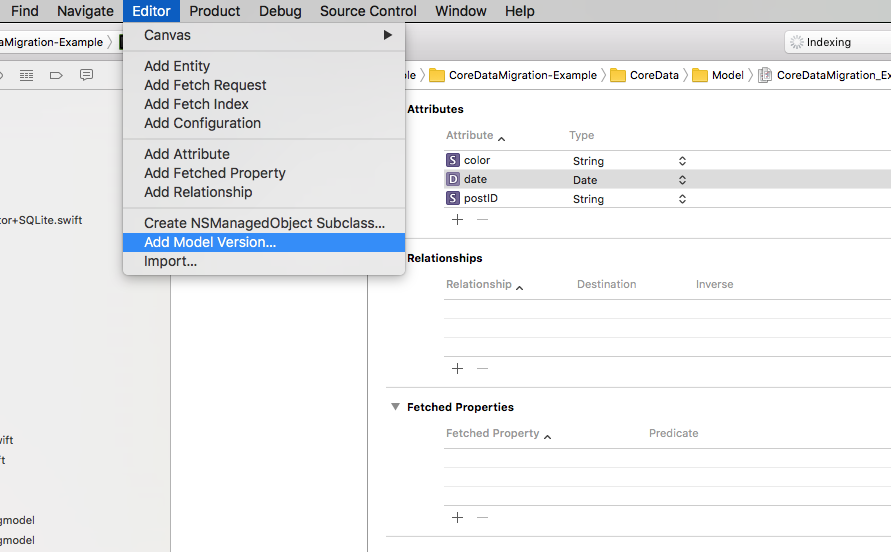
This can be achieved by highlighting the
xcdatamodel(it may be calledxcdatamodeld) and going toEditor->Add Model Version.... We then just need to name it, I would suggest keeping it the same name and adding a number to it soCoreDataMigration_Example 2.
So now we have two models and we can freely edit the model's structure within CoreDataMigration_Example 2.
When it comes to renaming color to hexColor we have two options:
canonical name*.xcmappingmodel
A canonical name effectively acts a bridge between what that property used to be called and what it now called. You would set the canonical name in the renaming identifier of that property. However here we are going to use *.xcmappingmodel.
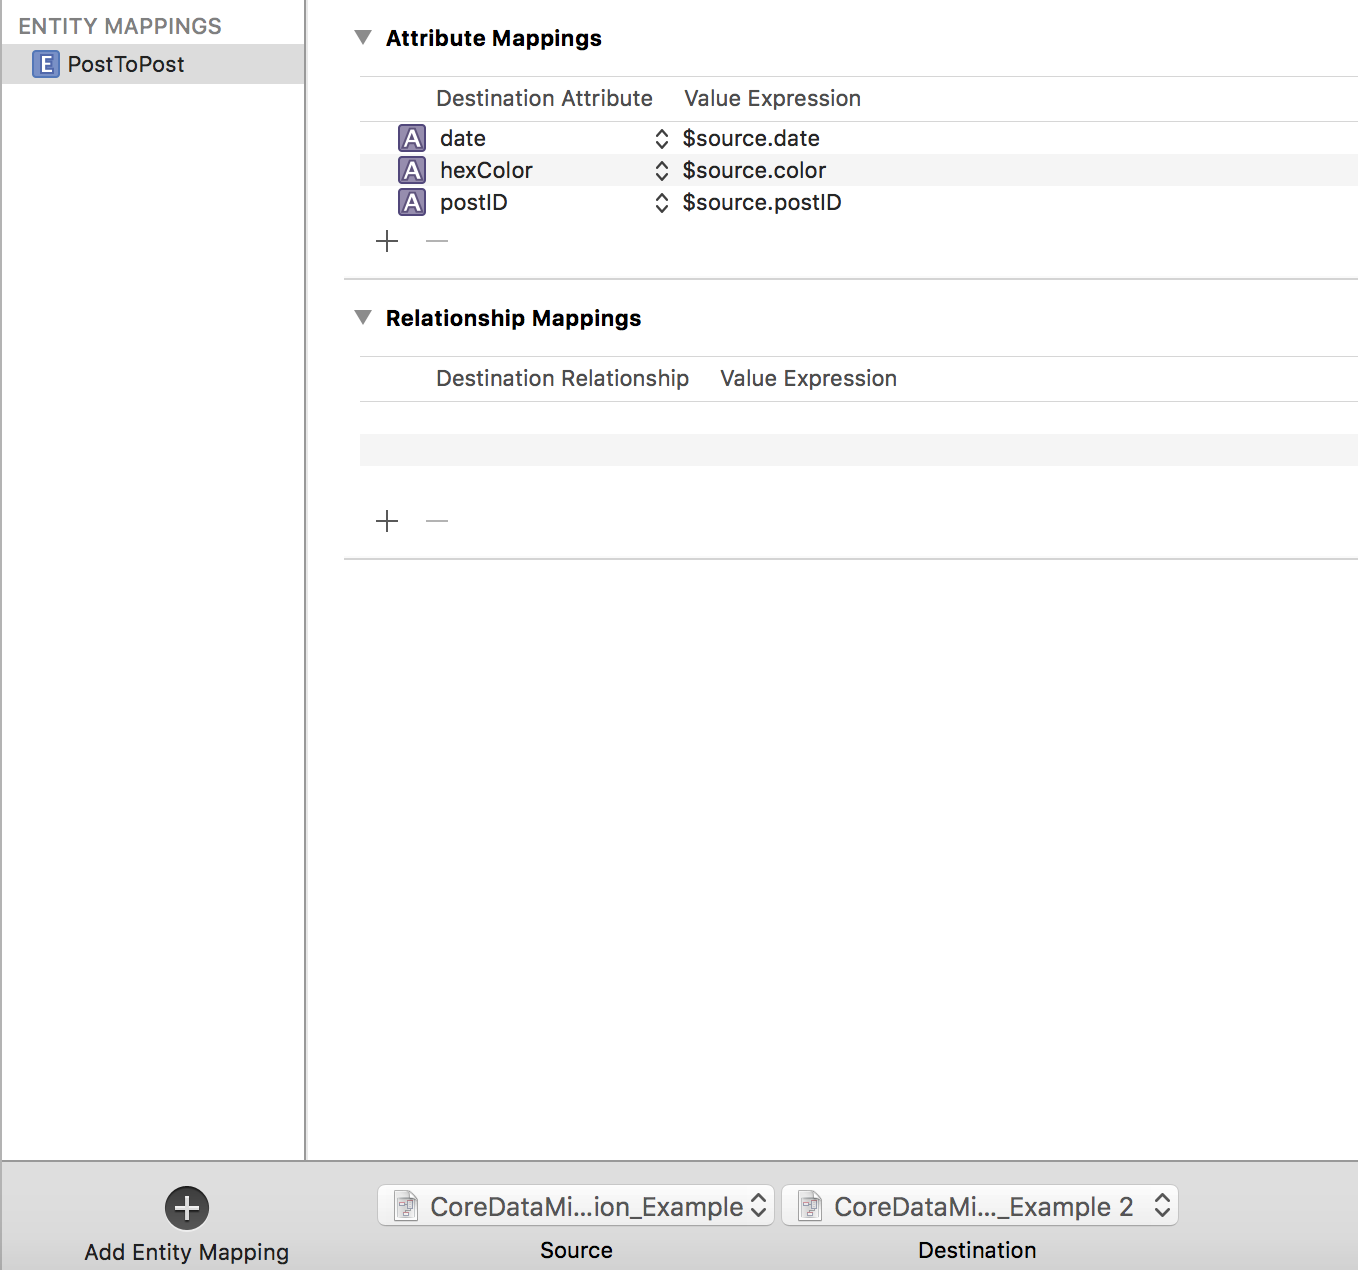
As you see in the above screenshot we have created a custom mapping between CoreDataMigration_Example (effectively version1) and CoreDataMigration_Example 2. As mentioned above we have created a custom mapping because we have renamed a property color to hexColor and Core Data isn't able to infer that these properties are the same. With this mapping we are telling Core Data that the new hexColor property should be mapped to old color property by: $source.color.
So if we were not doing the step-by-step migration approach but rather the standard Core Data migration approach, that would be our job finished. However as we discussed the standard Core Data migration approach does not scale well so we need to create our custom migrator.
Step-by-step Migrations
In order to build our stack, we have to answer a few questions:
- What is a Step?
- How do we group steps?
- What's responsible for triggering the migration?
Let's start answering them.
1. What is a Step?
struct CoreDataMigrationStep {

    let source: NSManagedObjectModel
    let destination: NSManagedObjectModel
    let mapping: NSMappingModel
}
A CoreDataMigrationStep is a migration between two versions of the model: source and destination and the actual mapping model itself.
It's possible to have multiple mapping models between versions, (this can be especially useful when migrating large data sets) in this post in an attempt to keep things simple I assume only one mapping model but if you need to support multiple mappings you would transform the
mappingproperty into an array.
2. How do we group steps?
First, lets create a representation of what a model version is:
enum CoreDataVersion: Int {
    case version1 = 1
    case version2

    // MARK: - Accessors

    var name: String {
        if rawValue == 1 {
            return "CoreDataMigration_Example"
        } else {
            return "CoreDataMigration_Example \(rawValue)"
        }
    }

    static var all: [CoreDataVersion] {
        var versions = [CoreDataVersion]()

        for rawVersionValue in 1...1000 { // A bit of a hack here to avoid manual mapping
            if let version = CoreDataVersion(rawValue: rawVersionValue) {
                versions.append(version)
                continue
            }

            break
        }

        return versions.reversed()
    }

    static var latest: CoreDataVersion {
        return all.first!
    }
}
CoreDataVersion is an enum backed by an Int that should mirror the versions available in *.xcdatamodeld package. It provides a nice abstraction for what a version is and allows us to ask questions on a type such as:
- "Which is the latest version?"
- "What's the name of that model?"
With both CoreDataMigrationStep and CoreDataVersion abstraction we can create a migration path from the source model to the destination model:
class CoreDataMigrationModel {

    let version: CoreDataVersion

    var modelBundle: Bundle {
        return Bundle.main
    }

    var modelDirectoryName: String {
        return "CoreDataMigration_Example.momd"
    }

    static var all: [CoreDataMigrationModel] {
        var migrationModels = [CoreDataMigrationModel]()

        for version in CoreDataVersion.all {
            migrationModels.append(CoreDataMigrationModel(version: version))
        }

        return migrationModels
    }

    static var current: CoreDataMigrationModel {
        return CoreDataMigrationModel(version: CoreDataVersion.latest)
    }

    /**
     Determines the next model version from the current model version.

     NB: the next version migration is not always the next actual version. With
     this solution we can skip "bad/corrupted" versions.
     */
    var successor: CoreDataMigrationModel? {
        switch self.version {
        case .version1:
            return CoreDataMigrationModel(version: .version2)
        case .version2:
            return nil
        }
    }

    // MARK: - Init

    init(version: CoreDataVersion) {
        self.version = version
    }

    // MARK: - Model

    func managedObjectModel() -> NSManagedObjectModel {
        let omoURL = modelBundle.url(forResource: version.name, withExtension: "omo", subdirectory: modelDirectoryName) // optimized model file
        let momURL = modelBundle.url(forResource: version.name, withExtension: "mom", subdirectory: modelDirectoryName)

        guard let url = omoURL ?? momURL else {
            fatalError("unable to find model in bundle")
        }

        guard let model = NSManagedObjectModel(contentsOf: url) else {
            fatalError("unable to load model in bundle")
        }

        return model
    }

    // MARK: - Mapping

    func mappingModelToSuccessor() -> NSMappingModel? {
        guard let nextVersion = successor else {
            return nil
        }

        switch version {
        case .version1: //manual mapped versions
            guard let mapping = customMappingModel(to: nextVersion) else {
                return nil
            }

            return mapping
        default:
            return inferredMappingModel(to: nextVersion)
        }
    }

    func inferredMappingModel(to nextVersion: CoreDataMigrationModel) -> NSMappingModel {
        do {
            let sourceModel = managedObjectModel()
            let destinationModel = nextVersion.managedObjectModel()
            return try NSMappingModel.inferredMappingModel(forSourceModel: sourceModel, destinationModel: destinationModel)
        } catch {
            fatalError("unable to generate inferred mapping model")
        }
    }

    func customMappingModel(to nextVersion: CoreDataMigrationModel) -> NSMappingModel? {
        let sourceModel = managedObjectModel()
        let destinationModel = nextVersion.managedObjectModel()
        guard let mapping = NSMappingModel(from: [modelBundle], forSourceModel: sourceModel, destinationModel: destinationModel) else {
            return nil
        }

        return mapping
    }

    // MARK: - MigrationSteps

    func migrationSteps(to version: CoreDataMigrationModel) -> [CoreDataMigrationStep] {
        guard self.version != version.version else {
            return []
        }

        guard let mapping = mappingModelToSuccessor(), let nextVersion = successor else {
            return []
        }

        let sourceModel = managedObjectModel()
        let destinationModel = nextVersion.managedObjectModel()

        let step = CoreDataMigrationStep(source: sourceModel, destination: destinationModel, mapping: mapping)
        let nextStep = nextVersion.migrationSteps(to: version)

        return [step] + nextStep
    }

    // MARK: - Metadata

    static func migrationModelCompatibleWithStoreMetadata(_ metadata: [String : Any]) -> CoreDataMigrationModel? {
        let compatibleMigrationModel = CoreDataMigrationModel.all.first {
            $0.managedObjectModel().isConfiguration(withName: nil, compatibleWithStoreMetadata: metadata)
        }

        return compatibleMigrationModel
    }
}
CoreDataMigrationModel this is where the real magic happens.
func migrationSteps(to version: CoreDataMigrationModel) -> [CoreDataMigrationStep] {
    guard self.version != version.version else {
        return []
    }

    guard let mapping = mappingModelToSuccessor(), let nextVersion = successor else {
        return []
    }

    let sourceModel = managedObjectModel()
    let destinationModel = nextVersion.managedObjectModel()

    let step = CoreDataMigrationStep(source: sourceModel, destination: destinationModel, mapping: mapping)
    let nextStep = nextVersion.migrationSteps(to: version)

    return [step] + nextStep
}
The above method recursively builds an array containing all the steps required to perform a migration from the current version (as defined by the version property) to the latest version.
For each of these steps, the model determines if the mapping should be inferred or needs to explicitly defined by the developer:
func mappingModelToSuccessor() -> NSMappingModel? {
    guard let nextVersion = successor else {
        return nil
    }

    switch version {
    case .version1: //custom mapped versions
        guard let mapping = customMappingModel(to: nextVersion) else {
            return nil
        }

        return mapping
    default:
        return inferredMappingModel(to: nextVersion)
    }
}
While strictly speaking we didn't need to include the inferred branch for migrating form
version1toversion2(and normally I try to avoid usingdefault), we will need an inferred mapping branch for future migrations so I've included it here for completeness.
As you can see we determine whether to create a custom or inferred mapping model by using a switch statement to check which version is current being accessed. You will know if you need to custom a mapping model if you break the rules as defined in the Lightweight documentation or more likely by attempting to perform an inferred migration and having the app crash on you during development.
func inferredMappingModel(to nextVersion: CoreDataMigrationModel) -> NSMappingModel {
    do {
        let sourceModel = managedObjectModel()
        let destinationModel = nextVersion.managedObjectModel()
        return try NSMappingModel.inferredMappingModel(forSourceModel: sourceModel, destinationModel: destinationModel)
    } catch {
        fatalError("unable to generate inferred mapping model")
    }
}

func customMappingModel(to nextVersion: CoreDataMigrationModel) -> NSMappingModel? {
    let sourceModel = managedObjectModel()
    let destinationModel = nextVersion.managedObjectModel()
    guard let mapping = NSMappingModel(from: [modelBundle], forSourceModel: sourceModel, destinationModel: destinationModel) else {
        return nil
    }

    return mapping
}
With inferredMappingModel we ask NSMappingModel to produce the mapping model by figuring out the differences and how to map between them. Again we follow the fail fast approach by catching the exception and then throwing a more meaningful fatal error.
customMappingModel is very similar but instead of getting an NSMappingModel instance based on Core Data figuring out the mapping, we ask it to search the app bundle and find a *.xcmappingmodel which has a matching source and destination model.
The next important part of CoreDataMigrationModel is to look at how the successor version of the current model is determined.
var successor: CoreDataMigrationModel? {
    switch self.version {
    case .version1:
        return CoreDataMigrationModel(version: .version2)
    case .version2:
        return nil
    }
}
As we only have two models we only need to handle migrating from version1 to version2. version2 being the current model, doesn't require a mapping model. You may be thinking that this is overkill and we could simplify this by always getting the next version up as the successor but sadly real-life isn't always so perfect and it's possible that we released a model version that contains issues and want to skip migrating any unaffected users to that version. With the above approach it would be possible to define a custom path. So if we pretend that we actually have four versions, it would be possible to skip a version altogether (in this case version3) which would give us the following structure:
var successor: CoreDataMigrationModel? {
    switch self.version {
    case .version1:
        return CoreDataMigrationModel(version: .version2)
    case .version2:
        return CoreDataMigrationModel(version: .version4) //skipping version3
    case .version3:
        return CoreDataMigrationModel(version: .version4)
    case .version4:
        return nil
    }
}
In order to perform we need to create an initial CoreDataMigrationModel instance based on the currently installed model version:
class CoreDataMigrationSourceModel: CoreDataMigrationModel {

    // MARK: - Init

    init?(storeURL: URL) {
        guard let metadata = NSPersistentStoreCoordinator.metadata(at: storeURL) else {
            return nil
        }

        let migrationVersionModel = CoreDataMigrationModel.all.first {
            $0.managedObjectModel().isConfiguration(withName: nil, compatibleWithStoreMetadata: metadata)
        }

        guard migrationVersionModel != nil else {
            return nil
        }

        super.init(version: migrationVersionModel!.version)
    }
}
CoreDataMigrationSourceModel is a convenience subclass of CoreDataMigrationModel. We will see later how this is used.
3. What's responsible for triggering the migration?
Ok, so we've looked at the how the steps are created and how each step knows which mapping model will move it to it's successor, below we are going to look at how those steps are called and how we prepare the app for a migration to occur.
class CoreDataMigrator {

    // MARK: - Check

    func requiresMigration(at storeURL: URL, currentMigrationModel: CoreDataMigrationModel = CoreDataMigrationModel.current) -> Bool {
        guard let metadata = NSPersistentStoreCoordinator.metadata(at: storeURL) else {
            return false
        }

        return !currentMigrationModel.managedObjectModel().isConfiguration(withName: nil, compatibleWithStoreMetadata: metadata)
    }

    // MARK: - Migration

    func migrateStore(at storeURL: URL) {
        migrateStore(from: storeURL, to: storeURL, targetVersion: CoreDataMigrationModel.current)
    }

    func migrateStore(from sourceURL: URL, to targetURL: URL, targetVersion: CoreDataMigrationModel) {
        guard let sourceMigrationModel = CoreDataMigrationSourceModel(storeURL: sourceURL as URL) else {
            fatalError("unknown store version at URL \(sourceURL)")
        }

        forceWALCheckpointingForStore(at: sourceURL)

        var currentURL = sourceURL
        let migrationSteps = sourceMigrationModel.migrationSteps(to: targetVersion)

        for step in migrationSteps {
            let manager = NSMigrationManager(sourceModel: step.source, destinationModel: step.destination)
            let destinationURL = URL(fileURLWithPath: NSTemporaryDirectory(), isDirectory: true).appendingPathComponent(UUID().uuidString)

            do {
                try manager.migrateStore(from: currentURL, sourceType: NSSQLiteStoreType, options: nil, with: step.mapping, toDestinationURL: destinationURL, destinationType: NSSQLiteStoreType, destinationOptions: nil)
            } catch let error {
                fatalError("failed attempting to migrate from \(step.source) to \(step.destination), error: \(error)")
            }

            if currentURL != sourceURL {
                //Destroy intermediate step's store
                NSPersistentStoreCoordinator.destroyStore(at: currentURL)
            }

            currentURL = destinationURL
        }

        NSPersistentStoreCoordinator.replaceStore(at: targetURL, withStoreAt: currentURL)

        if (currentURL != sourceURL) {
            NSPersistentStoreCoordinator.destroyStore(at: currentURL)
        }
    }

    // MARK: - WAL

    func forceWALCheckpointingForStore(at storeURL: URL) {
        guard let metadata = NSPersistentStoreCoordinator.metadata(at: storeURL), let migrationModel = CoreDataMigrationModel.migrationModelCompatibleWithStoreMetadata(metadata)  else {
            return
        }

        do {
            let model = migrationModel.managedObjectModel()
            let persistentStoreCoordinator = NSPersistentStoreCoordinator(managedObjectModel: model)

            let options = [NSSQLitePragmasOption: ["journal_mode": "DELETE"]]
            let store = persistentStoreCoordinator.addPersistentStore(at: storeURL, options: options)
            try persistentStoreCoordinator.remove(store)
        } catch let error {
            fatalError("failed to force WAL checkpointing, error: \(error)")
        }
    }
}
CoreDataMigrator is undertaking 3 tasks:
- Determining if migration is necessary
- Setting up a consistent state
- Performing the migration
func requiresMigration(at storeURL: URL, currentMigrationModel: CoreDataMigrationModel = CoreDataMigrationModel.current) -> Bool {
    guard let metadata = NSPersistentStoreCoordinator.metadata(at: storeURL) else {
        return false
    }

    return !currentMigrationModel.managedObjectModel().isConfiguration(withName: nil, compatibleWithStoreMetadata: metadata)
}
In the above method, we are loading the meta data for the persistent store that is currently on the device and determining if it is compatible with latest version's meta data - returning either true or false based on the outcome of that comparison.
func forceWALCheckpointingForStore(at storeURL: URL) {
    guard let metadata = NSPersistentStoreCoordinator.metadata(at: storeURL), let migrationModel = CoreDataMigrationModel.migrationModelCompatibleWithStoreMetadata(metadata)  else {
        return
    }

    do {
        let model = migrationModel.managedObjectModel()
        let persistentStoreCoordinator = NSPersistentStoreCoordinator(managedObjectModel: model)

        let options = [NSSQLitePragmasOption: ["journal_mode": "DELETE"]]
        let store = persistentStoreCoordinator.addPersistentStore(at: storeURL, options: options)
        try persistentStoreCoordinator.remove(store)
    } catch let error {
        fatalError("failed to force WAL checkpointing, error: \(error)")
    }
}
Since iOS 7 Core Data has used Write-Ahead Logging (WAL) journalling by default on it's SQLite database. In WAL mode Core Data appends transactions to a -wal file and uses a -shm shared memory file, both in the same location as the main sqlite file. While this results in improved performance I noticed when testing that sometimes during migrations, the changes contained in the -wal file were not migrated. This would then result in a crash when anything in the new model format was then written to the old model formatted -wal file. The above method is forcing the changes contained in the -wal file to be committed to the main sqlite file.
Please note that in order for the
-walcommit to be successful, it is necessary to load the model of the sqlite file on disk rather than the latest model.
As we will see below this forced committing of the WAL transactions will happen just before we perform the migration.
func migrateStore(at storeURL: URL) {
    migrateStore(from: storeURL, to: storeURL, targetVersion: CoreDataMigrationModel.current)
}

func migrateStore(from sourceURL: URL, to targetURL: URL, targetVersion: CoreDataMigrationModel) {
    guard let sourceMigrationModel = CoreDataMigrationSourceModel(storeURL: sourceURL as URL) else {
        fatalError("unknown store version at URL \(sourceURL)")
    }

    forceWALCheckpointingForStore(at: sourceURL)

    var currentURL = sourceURL
    let migrationSteps = sourceMigrationModel.migrationSteps(to: targetVersion)

    for step in migrationSteps {
        let manager = NSMigrationManager(sourceModel: step.source, destinationModel: step.destination)
        let destinationURL = URL(fileURLWithPath: NSTemporaryDirectory(), isDirectory: true).appendingPathComponent(UUID().uuidString)

        do {
            try manager.migrateStore(from: currentURL, sourceType: NSSQLiteStoreType, options: nil, with: step.mapping, toDestinationURL: destinationURL, destinationType: NSSQLiteStoreType, destinationOptions: nil)
        } catch let error {
            fatalError("failed attempting to migrate from \(step.source) to \(step.destination), error: \(error)")
        }

        if currentURL != sourceURL {
            //Destroy intermediate step's store
            NSPersistentStoreCoordinator.destroyStore(at: currentURL)
        }

        currentURL = destinationURL
    }

    NSPersistentStoreCoordinator.replaceStore(at: targetURL, withStoreAt: currentURL)

    if (currentURL != sourceURL) {
        NSPersistentStoreCoordinator.destroyStore(at: currentURL)
    }
}
In the above method we iterate through each of the migration steps using an instance of NSMigrationManager.
The more alert among you will have noticed that we store the user's data into a temporary sqlite file rather than override the starting sqlite file. This is a safety precaution incase an error happens during migration. We only overwrite the starting sqlite file once we know that the migration has been a success - this can be extremely useful during development.
In the above class we've seen a number of methods used that are not part of the standard NSPersistentStoreCoordinator API so I've included the extension that contains these methods below. As with most extensions, the methods are used to reduce boilerplate code.
extension NSPersistentStoreCoordinator {

    // MARK: - Destroy

    static func destroyStore(at storeURL: URL) {
        do {
            let persistentStoreCoordinator = NSPersistentStoreCoordinator(managedObjectModel: NSManagedObjectModel())
            try persistentStoreCoordinator.destroyPersistentStore(at: storeURL, ofType: NSSQLiteStoreType, options: nil)
        } catch let error {
            fatalError("failed to destroy persistent store at \(storeURL), error: \(error)")
        }
    }

    // MARK: - Replace

    static func replaceStore(at targetURL: URL, withStoreAt sourceURL: URL) {
        do {
            let persistentStoreCoordinator = NSPersistentStoreCoordinator(managedObjectModel: NSManagedObjectModel())
            try persistentStoreCoordinator.replacePersistentStore(at: targetURL, destinationOptions: nil, withPersistentStoreFrom: sourceURL, sourceOptions: nil, ofType: NSSQLiteStoreType)
        } catch let error {
            fatalError("failed to replace persistent store at \(targetURL) with \(sourceURL), error: \(error)")
        }
    }

    // MARK: - Meta

    static func metadata(at storeURL: URL) -> [String : Any]?  {
        return try? NSPersistentStoreCoordinator.metadataForPersistentStore(ofType: NSSQLiteStoreType, at: storeURL, options: nil)
    }

    // MARK: - Add

    func addPersistentStore(at storeURL: URL, options: [AnyHashable : Any]) -> NSPersistentStore {
        do {
            return try addPersistentStore(ofType: NSSQLiteStoreType, configurationName: nil, at: storeURL, options: options)
        } catch let error {
            fatalError("failed to add persistent store to coordinator, error: \(error)")
        }

    }
}
I won't go into their purpose as I think that is self-evident.
Wrapping it all into the manager
At the start of this post we looked at our simple, migration free Core Data stack, it's now time to go back to that manager and look at how supporting migrations will affect it.
class CoreDataManager {

    let migrator: CoreDataMigrator

    lazy var persistentContainer: NSPersistentContainer! = {
        let persistentContainer = NSPersistentContainer(name: "CoreDataMigration_Example")
        let description = persistentContainer.persistentStoreDescriptions.first
        description?.shouldInferMappingModelAutomatically = false //inferred mapping will be handled else where

        return persistentContainer
    }()

    lazy var backgroundContext: NSManagedObjectContext = {
        let context = self.persistentContainer.newBackgroundContext()
        context.mergePolicy = NSMergeByPropertyObjectTrumpMergePolicy

        return context
    }()

    lazy var mainContext: NSManagedObjectContext = {
        let context = self.persistentContainer.viewContext
        context.automaticallyMergesChangesFromParent = true

        return context
    }()

    // MARK: - Singleton

    static let shared = CoreDataManager()

    // MARK: - Init

    init(migrator: CoreDataMigrator = CoreDataMigrator()) {
        self.migrator = migrator
    }

    // MARK: - SetUp

    func setup(completion: @escaping () -> Void) {
        loadPersistentStore {
            completion()
        }
    }

    // MARK: - Loading

    private func loadPersistentStore(completion: @escaping () -> Void) {
        migrateStoreIfNeeded {
            self.persistentContainer.loadPersistentStores { description, error in
                guard error == nil else {
                    fatalError("was unable to load store \(error!)")
                }

                completion()
            }
        }
    }

    private func migrateStoreIfNeeded(completion: @escaping () -> Void) {
        guard let storeURL = persistentContainer.persistentStoreDescriptions.first?.url else {
            fatalError("persistentContainer was not set up properly")
        }

        if migrator.requiresMigration(at: storeURL) {
            DispatchQueue.global(qos: .userInitiated).async {
                self.migrator.migrateStore(at: storeURL)

                DispatchQueue.main.async {
                    completion()
                }
            }
        } else {
            completion()
        }
    }
}
As you can see, it's not too different to what we seen before. But let's look at what has changed:
let migrator: CoreDataMigratorWe store an instance CoreDataMigrator as a property which we pass in during init'ing the CoreDataManager instance:
init(migrator: CoreDataMigrator = CoreDataMigrator()) {
    self.migrator = migrator
}
As we will see in our unit testing by injecting the migrator we will be able to more easily test different scenarios by overriding it's methods.
As we are going to override the default migration process we next need to take control of it:
lazy var persistentContainer: NSPersistentContainer! = {
    let persistentContainer = NSPersistentContainer(name: "CoreDataMigration_Example")
    let description = persistentContainer.persistentStoreDescriptions.first
    description?.shouldInferMappingModelAutomatically = false //inferred mapping will be handled else where

    return persistentContainer
}()
Here is set shouldInferMappingModelAutomatically to false as our CoreDataMigrationModel class will handle setting the correct mapping model approach on each CoreDataMigrationStep step.
private func loadPersistentStore(completion: @escaping () -> Void) {
    migrateStoreIfNeeded {
        self.persistentContainer.loadPersistentStores { description, error in
            guard error == nil else {
                fatalError("was unable to load store \(error!)")
            }

            completion()
        }
    }
}

private func migrateStoreIfNeeded(completion: @escaping () -> Void) {
    guard let storeURL = persistentContainer.persistentStoreDescriptions.first?.url else {
        fatalError("persistentContainer was not set up properly")
    }

    if migrator.requiresMigration(at: storeURL) {
        DispatchQueue.global(qos: .userInitiated).async {
            self.migrator.migrateStore(at: storeURL)

            DispatchQueue.main.async {
                completion()
            }
        }
    } else {
        completion()
    }
}
The migrateStoreIfNeeded method continues with our fail fast approach by throwing a fatal error if the persistent container doesn't meet our expectations. Next we ask the question:
"Do we need to perform a migration here?"
If the answer is yes - the migrator then attempts to perform the migration on a background queue/thread before triggering it's completion closure once the migration is complete and allowing the Core Data stack to contine being set up.
If the answer is no - the completion block is called and setting up the Core Data stack continues unabated.
Migration completed! 🎉 🎉 🎉
Woohoo! That's us at the end of migrating from version1 to version2 of our model. It was a lot to take in but trust me, it will get much easier to perform future migrations now that we implemented this step-by-step approach.
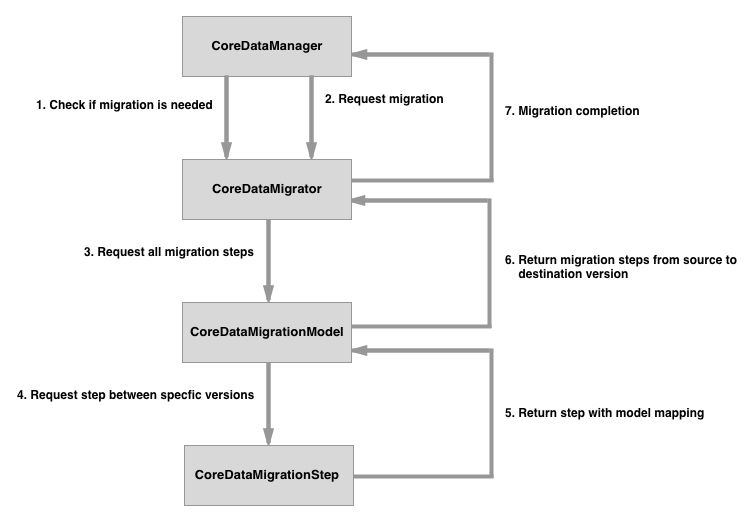
As a recap, let's see a lovely diagram of what we just created:
From v2 to v3
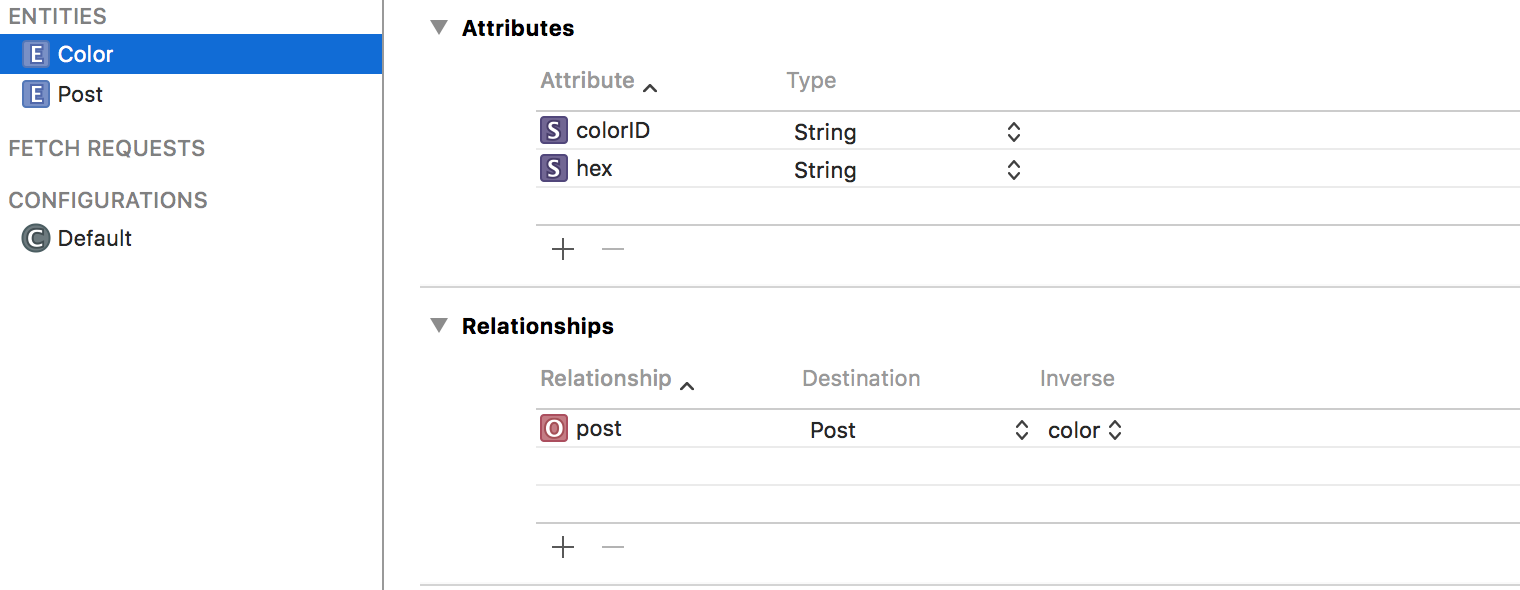
So far we have migrated from model version1 to version2 but the new hexColor is still causing issues so instead we decide to extract it out into it's own Entity: Color. This change will required us to create a new version CoreDataMigration_Example 3 which looks like:
Now this migration is slightly trickier than from version1 to version2 and will require us to create not only a xcmappingmodel but also a custom NSEntityMigrationPolicy subclass.
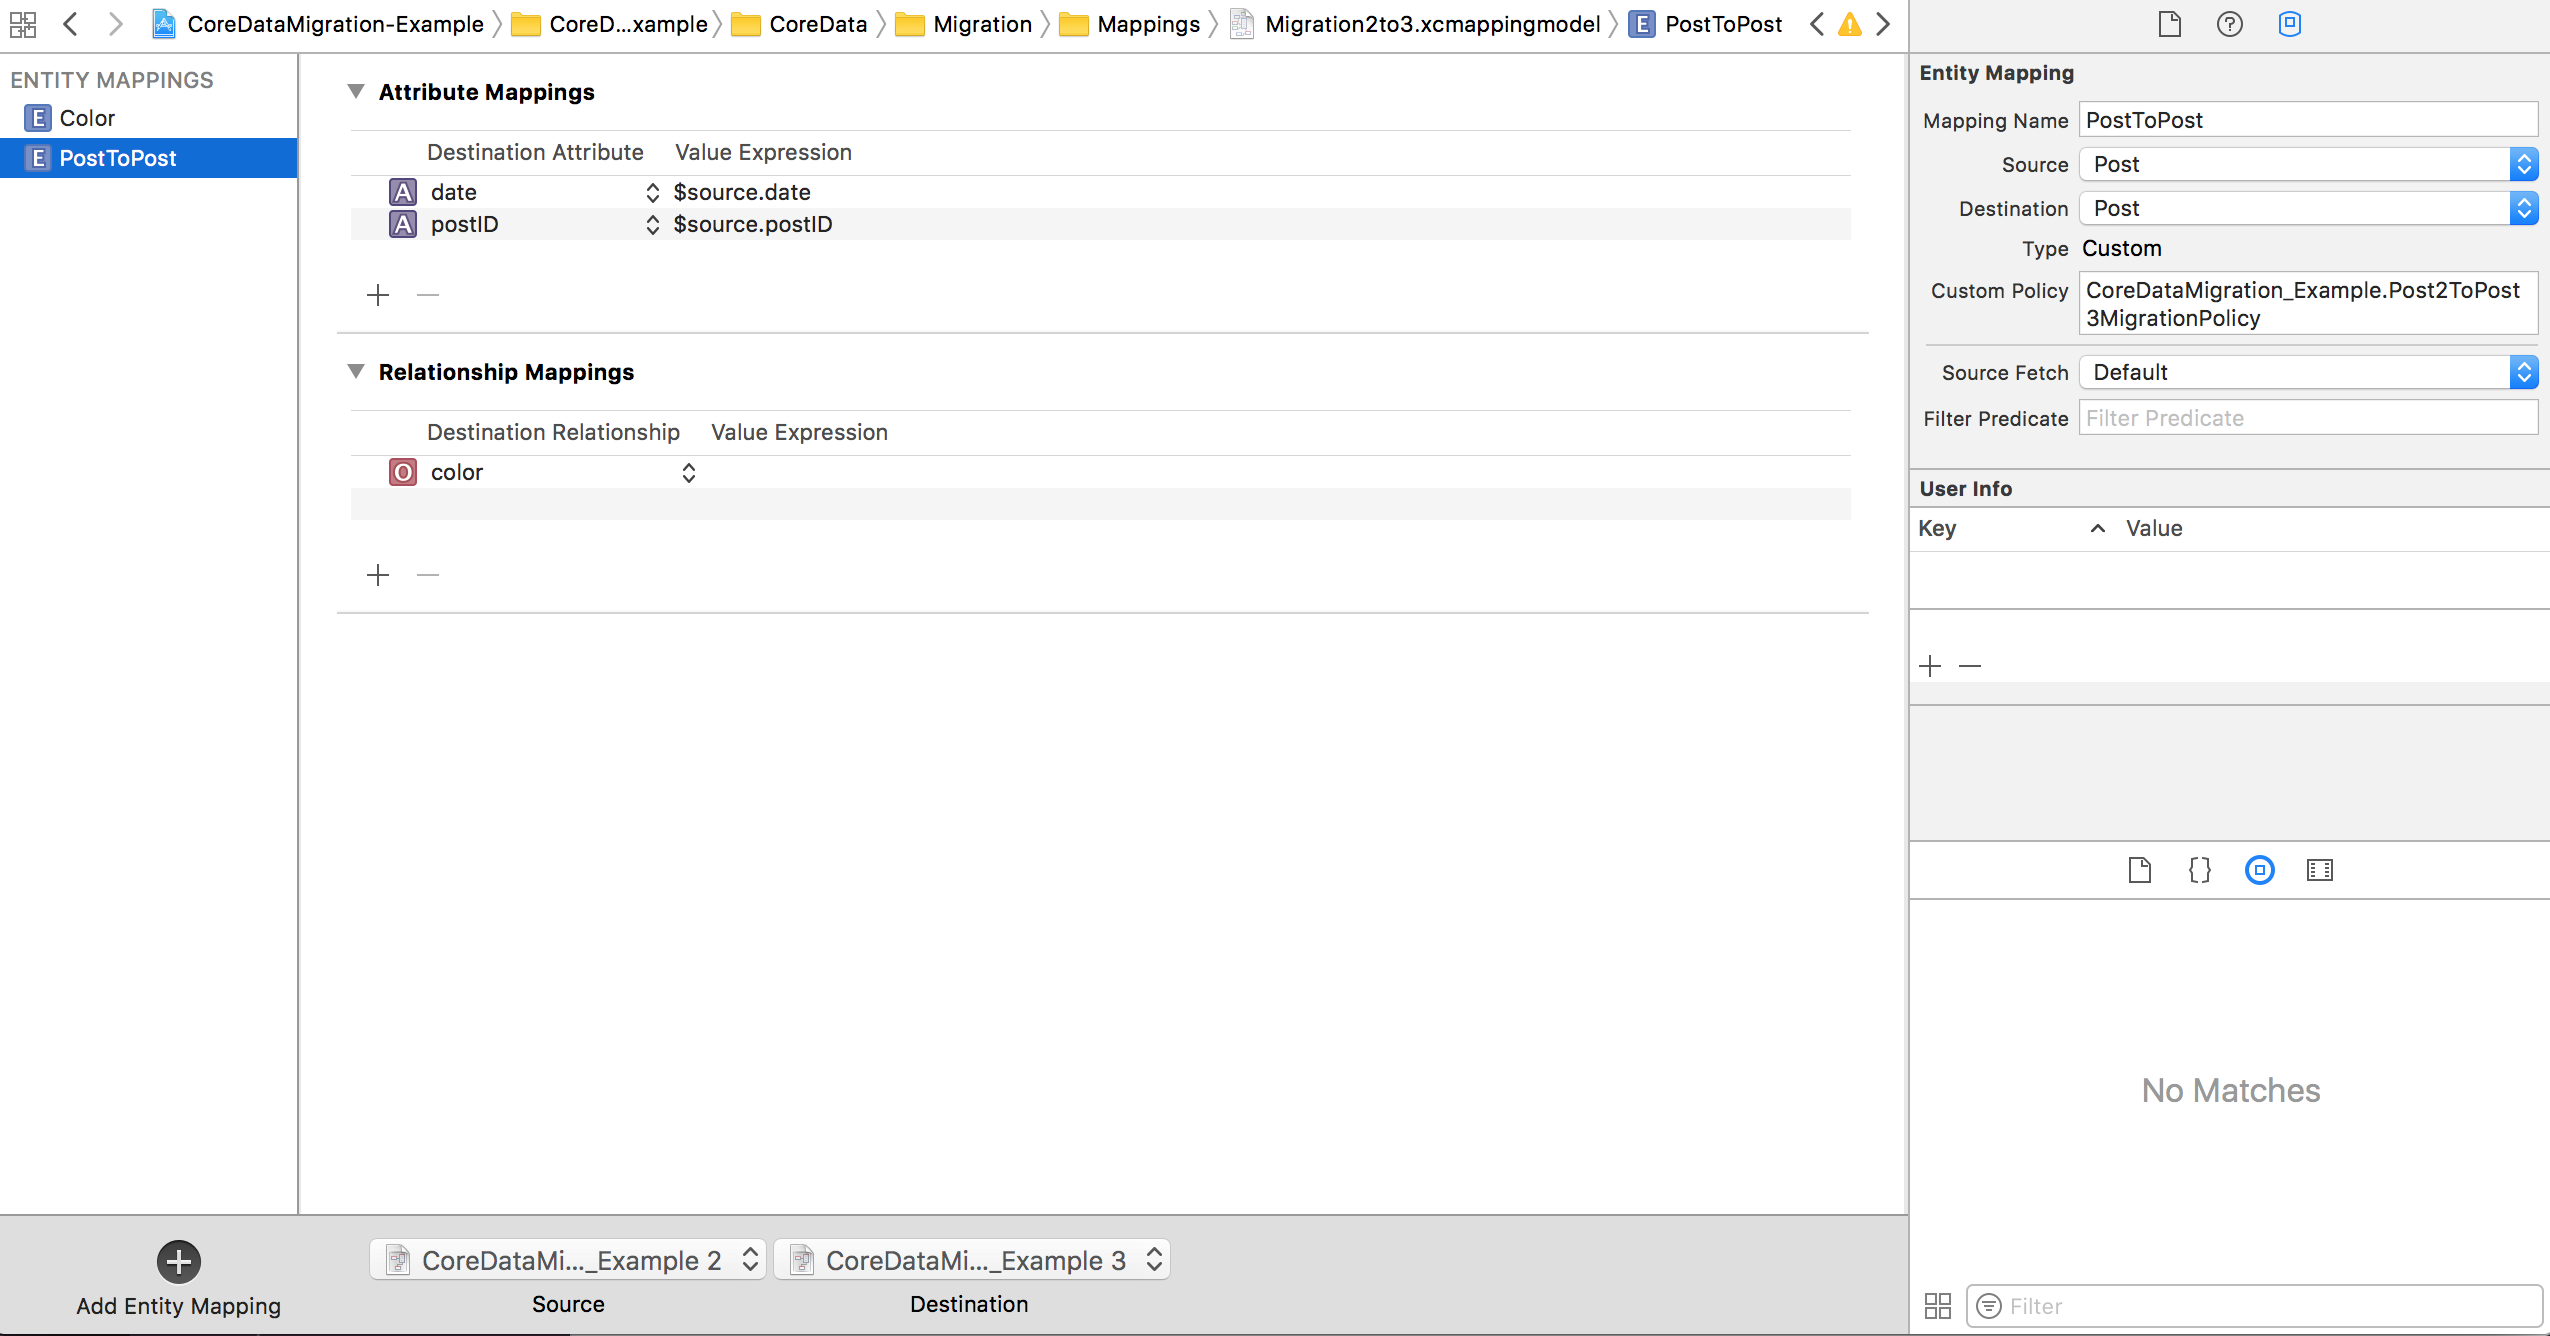
As you see in the above screenshot we have created a custom mapping between CoreDataMigration_Example 2 and CoreDataMigration_Example 3. In version3 we have introduced a new entity Color which has taken the place of the previous color property on the Post entity - you can see in the 'Custom Policy' field we are using Post2ToPost3MigrationPolicy to handle migrating from this property to an entity.
final class Post2ToPost3MigrationPolicy: NSEntityMigrationPolicy {

    override func createDestinationInstances(forSource sInstance: NSManagedObject, in mapping: NSEntityMapping, manager: NSMigrationManager) throws {
        try super.createDestinationInstances(forSource: sInstance, in: mapping, manager: manager)

        guard let dInstance = manager.destinationInstances(forEntityMappingName: mapping.name, sourceInstances: [sInstance]).first else {
            fatalError("was expecting a post")
        }

        let color = NSEntityDescription.insertNewObject(forEntityName: "Color", into: dInstance.managedObjectContext!)
        color.setValue(UUID().uuidString, forKey: "colorID")
        color.setValue(sInstance.value(forKey: "hexColor"), forKey: "hex")

        dInstance.setValue(color, forKey: "color")
    }
}
One interesting point to note, is that we are dealing with NSManagedObject rather than our custom NSManagedObject subclasses. This is because Core Data wouldn't know which version of Post to load. So to work with both representations of the data we need to use KVC to get and set properties.
Next we need to make some changes to our CoreDataMigrationModel class by introducing a version3 case and handling migrating from version2 to version3:
var successor: CoreDataMigrationModel? {
    switch self.version {
    case .version1:
        return CoreDataMigrationModel(version: .version2)
    case .version2:
        return CoreDataMigrationModel(version: .version3)
    case .version3:
        return nil
    }
}
and as migrating to version3 will require a custom mapping model:
func mappingModelToSuccessor() -> NSMappingModel? {
    guard let nextVersion = successor else {
        return nil
    }

    switch version {
    case .version1, .version2: //manual mapped versions
        guard let mapping = customMappingModel(to: nextVersion) else {
            return nil
        }

        return mapping
    default:
        return inferredMappingModel(to: nextVersion)
    }
}
From v3 to v4
The success of our app knows no bounds and we decide to add the ability to hide posts that have been seen. We want to store this hidden value in our model. So we need to add a new version CoreDataMigration_Example 4. The good news here is that as this change involves adding properties to our model rather than transforming an existing Entity we can use the inferred mapping approach. This means that we need to make even fewer code changes than when we migrated from version2 to version3:
var successor: CoreDataMigrationModel? {
    switch self.version {
    case .version1:
        return CoreDataMigrationModel(version: .version2)
    case .version2:
        return CoreDataMigrationModel(version: .version3)
    case .version3:
        return CoreDataMigrationModel(version: .version4)
    case .version4:
        return nil
    }
}
And that's it.
Making sure it actually migrates
With something as important as data migrations we need to be sure that it actually works. While I won't post all of the unit tests here, it's important to touch on those unit tests as creating a Core Data stack that was unit testable played a major role in helping to shape the above approach. So let's look at how we test that it's possible to migrate from one version of the model to another:
func test_individualStepMigration_3to4() {
    let sourceURL = CoreDataMigratorTests.moveFileFromBundleToTmpDirectory(fileName: "CoreDataMigration_Example_3.sqlite")
    let targetURL = sourceURL

    let modifiedDateBeforeMigration = try! FileManager.default.attributesOfItem(atPath: sourceURL.path)[FileAttributeKey.modificationDate] as! Date

    migrator.migrateStore(from: sourceURL, to: targetURL, targetVersion: CoreDataMigrationModel(version: .version4))

    let modifiedDateAfterMigration = try! FileManager.default.attributesOfItem(atPath: targetURL.path)[FileAttributeKey.modificationDate] as! Date

    XCTAssertTrue(FileManager.default.fileExists(atPath: targetURL.path))
    XCTAssertTrue(modifiedDateAfterMigration.timeIntervalSince(modifiedDateBeforeMigration) > 0)
}
So in the test target we have a number of sqlite files filled with data for each version of our model, we then load the appropriate sqlite file and attempt to migrate checking that such a migration has in fact occurred and been successful.
Please see the GitHub repo for more unit tests.
We got there 🏁
Core Data migration can often seem like a very dense and difficult to understand process but hopefully with the above example you can see that by breaking it down into small steps and getting creative with how you then connect those steps together, you can actually take a lot of the difficulty out migrations.
And remember if that's how someone on the bus reacts to having to move their bag, we should try and spare this person the trauma that losing their unlocked thingamabobs would surely cause 😉.
I would like to acknowledge that I leaned on the most excellent Core Data book by Florian Kugler and Daniel Eggert which you can get here. I would highly recommend that you give that book a read as it's a treasure trove of Core Data knowledge.
What do you think? Let me know by getting in touch on Twitter - @wibosco